Its day 2 of Atkins diet Induction phase. Breakfast went well. I have to tell you thats the best part of the whole day :) . I make a two egg omlette with onions , bell peppers and cheese. I think I'm going to make this everyday.
Breakfast Omlette:
Ingredients:
Eggs - 2
Finely chopped red onions - 1/4 cup
Finely chopped bell pepper - 1/4 cup
Olive oil - 1 tsp
Butter - 1 tsp
Water - 1 tsp
Shredded cheddar cheese - 1 oz , about a small handful
salt and pepper to taste
Recipe:
1. Heat oil in a small omlette pan in medium heat.
2. Add chopped onions and bell peppers.
3. While its cooking, beat together eggs, salt, pepper and water till the eggs color is light yellow.
4. When the onions and bell peppers are cooked, add butter to the pan.
5. Swirl the melting butter aroud the pan.
6. Add the egg mixture and swirl the pan so that the egg mixture covers the whole pan.
7. Turn the pan to low heat and close the pan.
8. After about 2 mins, open the pan. There will be some runny egg mixture on top.
9. Sprinkle the shredded cheese on top.
10. Use a spatula and fold the omlette over the cheese.
11. Close the pan again.
12. Switch off in a min. Omlette ready!!!
I absolutely love this. Its fluffy and cheesy.
So, here is the menu for today
Breakfast: Omletter
Snack: Atkins bar - I personally like the caramel nut bar
Lunch: Rosemary roasted Chicken and vegs
Snack: Atkins shake - Dark Chocolate royale
Dinner: Tuna salad on lettuce
Ok, so, I was craving sugar so badly today and I had a jello right after breakfast!! I could not help it! But I think I'm getting a hold on the sugar cravings. I did NOT have jello after dinner. Yeah!!
Tuesday, April 13, 2010
Monday, April 12, 2010
Atkins Diet - Induction Phase - Day 1
Its been a long, long time since I posted anything in the blog. Too many changes in that time frame. But now my mission is to .... lose weigt!! I know, I know.. nothing lofty as change the face of cooking as we know today. Just a lowly aim of losing weight I put and.. ahem.. and carried on for 3 years now after the birth of my daughter. I was able to successfully lose the pregnancy weight and 15 more when I did that after I had my son and I did it in within a year!!! Now what is so different about this one, you ask.... Well, whatever I did for the first weight loss did not work. I also have been trying to do my own diet by cutting carbs and sugar. But I just was not able to stick to it because I was not holding myself accountable and did not know what I was doing.
Result: I'm going to try Atkins diet. There are reasons for that too. The main one being meat... I'm a pure carnivore. I do love my fruits and vegs,but I'm a carnivore to the core. The second reason being my desire to cut carbs and sugars for health reason. So, Atkins seemed to be a good choice.
I'm not going to put the Phase I induction rules here since you can find it anywhere on the web. But here is the gist of it,
1. No fruits, bread, grains, starchy vegetables or dairy other than cheese, cream or butter
2. No sugar but can use splenda, which means no soda,gum
3. Drink atleast eight 8oz cups of water
Here is what you can eat,
1. All kinds of meat
2. All kinds of fish and seafood
3. Atkins bars and shakes for snacks
4. Salad greens and non-starchy vegetables
Here is the caveat, I love sweets!!! And Splenda is not sugar and I hate the after taste. And no fruits!!! I love fruits. I have atleast 4 servings of fruits everyday. How am I going to survive this??? I don't know but I'm going to try.
Here is my menu for today
Breakfast : Two egg omlette with onions, bellpeppers and cheese
Snack : Atkins bar
Lunch : 2 cups of loosely packed lettuce with 5 oz can of tuna mized with 1 tablespoon mayo
Snack : Atkins shake
Dinner : 5 oz pork tenderloin with cup of steamed brocolli and cauliflower, 1 sugar free gello
I have done till lunch so far and I'm feeling hungry. Which tells me I have been eating way too much. Easter took a toll on my own 'diet'. So, I'm hoping the Atkins diet will do the trick.
Update: ok, I'm done with Day 1 in the Induction phase. Dinner was delicious!! I love all this meat :) . But that said, I still feel hungry and craving for sugar. I did drink a lot of water today. Atleast Atkins is helping with water intake for now. Time to hit the bed before hunger gets better of me.
Saturday, February 21, 2009
Daring Bakers Challenge - Feb 2009
The February 2009 challenge is hosted by Wendy of WMPE's blog and Dharm of Dad ~ Baker & Chef. We have chosen a Chocolate Valentino cake by Chef Wan; a Vanilla Ice Cream recipe from Dharm and a Vanilla Ice Cream recipe from Wendy as the challenge.

The recipe chosen was a great selection for the month of February. The recipe called for just three ingredients - chocolate, butter and eggs. It was up to us to interpret it as we wanted it. The type of chocolate was also left to us. Since DH is not a bittersweet chocolate person, I almost exclusively used milk chocolate. Since I was in an sneaky mood, I sneaked in some bitter chocolate with chili. The recipe promised that the cake will taste exactly like the chocolate which was chose. But the cake was pure chocolate heaven!!! It was the most amazing chocolate cake I have ever had. I loved it. Making was really easy. This is the easiest challenge I have had so far.
This month's challenge also included a second part to it. Since this was an easy challenge, we were also asked to make ice cream to go with this delicious challenge. I chose to make Salted Butter Caramel Ice Cream Recipe by David Lebovitz. It came out really well. The combination was just perfect.

Friday, January 2, 2009
Daring Bakers - Jan 2009 Tuiles
This month's challenge is brought to us by Karen of Baking Soda and Zorra of 1x umruehren bitte aka Kochtopf. They have chosen Tuiles from The Chocolate Book by Angélique Schmeink and Nougatine and Chocolate Tuiles from Michel Roux.
I was very disappointed when I was not able to participate in the December challenge. I was really looking forward to it since it was a really challenging. The Flu season took a toll on my family and so I was not able to participate.
So, What are Tuiles, you ask? Tuiles are thin, crisp almond cookies that are gently molded over a rolling pin or arched form while they are still warm. We were allowed to make the cookies in any shape we wanted as long as we stayed true to the recipe and technique. And that was my issue, my friends, because I have no power of imagination and creativity what-so-ever.
I decided to stay simple and make a very simple design. The plan was to make a cookie bowl and serve something sweet inside it for a dinner party for our friends. By now, everybody knows my obsession with mango. So, the lucky filling was going to be mango kesari. I found the yummiest recipe online. I could make it in the microwave and it was so easy.... But I digress..
How hard can it be to make a thin almond cookie and shape it. I mean, seriously, this was the smallest recipe we have ever been presented with and since I have been doing this for sometime...... I had a stencil ready to make the cookie. The batter was a breeze to make. The oven was preheated. Everything was ready to go.
You know what they say about Pride that it goes before a fall.And that what this challenge was for me.. It was huge but gradual fall!!!! I had a tough time spreading the batter thin. I tried leaving it in the fridge longer. Still no luck. Anyway, I forged ahead. I got ONE.. count ONE bowl out of the whole batch. The trick was in making it thin and shape it as soon as it came out of the oven. All the my cookies turned out too thick and it broke when I tried to shape it. At least I was able to get one bowl to serve my yummy kesari :) I drizzled little rose syrup for interest. In spite of the 'fall', we liked the taste of the almond cookie. It was pretty mild. I would definitely try again. These would make very elegant dessert cups.
Now, don't let my story stop you from visiting my fellow bakers creations. They are just amazing. You can find the recipe for the tuiles at hostess site. I'll post the kesari recipe soon. It absolutely deserves its own post.

Saturday, November 29, 2008
Daring Bakers Challenge - Caramel Cake
Ok, we are back to cakes after 3 non-cake challenges. I have been looking forward to a cake challenge since its the holiday season.
This month's challenge is hosted by Doleres at (http://culinarycuriosity.blogspot.com/) , Alex (Brownie of the Blondie and Brownie duo: http://blondieandbrownie.blogspot.com/), Jenny of Foray into Food (http://forayintofood.blogspot.com/). They were also assisted by Natalie of Gluten-a-Go-Go (http://glutenagogo.blogspot.com/) for the Gluten free translation.
This month's challenge is Caramel Cake with Caramelized Butter Frosting courtesy of Shuna Fish Lydon (http://eggbeater.typepad.com/), as published on Bay Area Bites (http://blogs.kqed.org/bayareabites/).
So, back to the challenge.. I did not have any issues making the caramel sauce or the cake. I have made caramel sauce before for Christmas cakes. So, that was a breeze. The cake and the icing was very easy to make. I was able to make it today in a rush on the posting date. That says a lot as far as the ease of making the cake. The cake and icing turned out nice. My family loved it. But the icing was too sweet to my taste. This coming from a person who has a mouthful of sweet teeth. I felt that the icing overwhelmed the cake. All in all, it was easy breezy challenge.
You can see rest of the daring bakers creations at http://daringbakersblogroll.blogspot.com/

This month's challenge is hosted by Doleres at (http://culinarycuriosity.blogspot.com/) , Alex (Brownie of the Blondie and Brownie duo: http://blondieandbrownie.blogspot.com/), Jenny of Foray into Food (http://forayintofood.blogspot.com/). They were also assisted by Natalie of Gluten-a-Go-Go (http://glutenagogo.blogspot.com/) for the Gluten free translation.
This month's challenge is Caramel Cake with Caramelized Butter Frosting courtesy of Shuna Fish Lydon (http://eggbeater.typepad.com/), as published on Bay Area Bites (http://blogs.kqed.org/bayareabites/).
Something new was introduced this month, an optional challenge. We could also make Golden Vanilla Bean Caramels from Pure Dessert by Alice Medrich, Artisan Press, Copyright 2007, ISBN: 978-1579652111 . Since it was a crazy busy month, I skipped the optional challenge. But I'm definitely trying it out for the Christmas party I'll be hosting next month. You can find the recipe here.
So, back to the challenge.. I did not have any issues making the caramel sauce or the cake. I have made caramel sauce before for Christmas cakes. So, that was a breeze. The cake and the icing was very easy to make. I was able to make it today in a rush on the posting date. That says a lot as far as the ease of making the cake. The cake and icing turned out nice. My family loved it. But the icing was too sweet to my taste. This coming from a person who has a mouthful of sweet teeth. I felt that the icing overwhelmed the cake. All in all, it was easy breezy challenge.
You can see rest of the daring bakers creations at http://daringbakersblogroll.blogspot.com/

Wednesday, October 29, 2008
Daring Bakers Challenge - Pizza!!!
This month's challenge was hosted by Rosa at Rosa's Yummy Yums. She chose Pizza!!! After my dismal performance at these challenges for the past two months, I decided to finish this challenge way before the deadline.
One of my weekend activities is cooking for the week. So, I made the pizza dough on Sunday and I made the pizzas during the week. Since we did not have any restriction on the toppings or sauce, ,my first thought was to make traditional pizza sauce and toppings. Then I threw the idea out of the window and wanted to make Indian version of pizza. I decided to make tandoori chicken pizza and spicy chicken sausage pizza.
Tandoori chicken Pizza Toppings
Tandoori Chicken, green bell peppers, onions
Before After


Chicken Sausage Pizza Toppings
Pan fried spicy chicken sausage, orange bell peppers, onions
Before

No after pictures on this since it was gobbled up before I could take a picture :)
The sauce I used was Tomato yogurt sauce based on this recipe. I modified the recipe a bit with quantity of tomato used and the leaves. I have to say though the tomato yogurt sauce did do better with the chicken sausage pizza.
The Cheese I used was homemade paneer.
One of the activities to complete this month's challenge was a picture of yourself throwing the pizza up in the air. DH tried his best to a take a picture of the dough in the air. But this is all we could get :)

The pizza was a huge hit!! DH loved the pizza. All my son wanted was the crust. I will definitely be making this again.
You can find the recipe for the pizza dough here. You can view all the wonderful pizzas made by fellow daring bakers here. There are some sweet ones too :).
Saturday, September 27, 2008
Daring Bakers - Lavash Crackers
I was so disappointed last month since I was not able to complete the challenge. So, I completed this month's challenge well ahead of time.
This month's challenge was hosted by ShellyFish at Musing from the Fish Bowl and Natalie of Gluten A Go Go. The challenge was to make Lavash Crackers. You can find the recipe here.
I found the challenge really easy. As usual, I was dreading the yeast beast. The crackers came out really well. The photos do no justice to the crackers itself. I made one batch of savoury crackers with cumin and batch of sweet crackers with cinnamon sugar. I liked the cinnamon sugar crackers with sweet yogurt dip. I served the cumin crackers with home-made salsa.


Wednesday, August 6, 2008
Beef Curry
Today was beef day at our home. DH is not a big fan of beef or pork. While likes having it , he is a minimalist. So, I cook it once or twice a month. I have been wanting to make Chettinad beef curry by Annita at My Pleasure...My Treasure for sometime now. My mouth watered just looking at the picture.
When I started to collect the ingredients together to make it, I was falling short on couple of ingredients. So, I had to make some changes to ingredients. I went easy on the chili too. While I did make changes to the recipe, the end result was just awesome. DH was in heaven and my son loved it. I would have liked a bit more heat though. So, I'm definitely trying the recipe as is next time.
Here is how I made it,
Beef Curry
Ingredients:
Beef cut into small pieces - 1/2 lb
Mustard seeds - a pinch
Onion chopped finely - 1 cup
Curry leaves - 1 sprig
Tomato sliced - 1/2 cup
Salt - to taste
Oil - as needed
For Grinding:-
Ginger - 1 inch size piece
Garlic pods - 7-8
Cinnamon(Karuvapatta) - 2 pieces
Cloves (Grambu) - 4 nos
Fennel seeds(Perumjeerakam) - 1/2 tsp
Cumin seeds(Jeerakam) - 1/2 tsp
Pepper powder - 1/4 tsp
Chilly Powder - 2 tsp
Coriander seeds - 2 tsp
Turmeric powder - 1/2 tsp
Green chili - 1
Coriander leaves - a handful
Curry leaves - 10
Instructions:
- Grind all the ingredients in 'For grinding' into a coarse paste and keep it aside.
- Marinate the beef in the coarse paste for half an hr.
- Pressure cook the beef till tender, around 4-5 whistles
- In a fry pan, heat oil
- Add mustard seeds and curry leaves
- Saute onions till soft
- Add tomatoes to this and cook till soft
- Add the cooked beef to this.
- Add salt to taste
- Cook till the curry is on the dry side.

Wednesday, July 30, 2008
Daring Bakers Challenge#3 - Filbert Gateau with Praline Buttercream

Its my third Daring bakers Challenge. I was feeling pretty confident after the last two challenges. And that was till I read this month's challenge.
This month's challenge is hosted by Chris at Mele Cotte . She chose Filbert Gateau with Praline ButterCream from Great Cakes by Carol Walter. The recipe was 6 pages long and had many steps. But the picture of the cake was just mouthwatering. I usually finish my challenge early. But this time I waited till the end to do it because of two birthday parties.
The only change I made to the cake was I used Cashew nuts(my fav nut) instead of hazelnut. I also skipped whipped cream since my family despises it. Seriously, they do :)
I did have some challenges though. The recipe called for a food processor. My friends would tell you that I DO NOT break rules. This helped me a lot when it comes to baking :) . So, I was ready to run to Walmart to get a food processor. But since I was not ready spend money for a food processor which I would probably not use after making the cake, I ditched the Walmart idea.
So, I just toasted the cashews and ground it like I did for the Opera Cake and mixed it with the cake flour and corn starch. Phew! one challenge down. The recipe also tells you pour the cake batter slowly and not to dump the clarified butter(ghee) into the cake batter. This would stop the cake from rising. And of course, in my haste to get the cake to the oven, I did exactly that. Needless to say, my cake did not rise well. I was so tempted to forgo dividing the cake into three lakes. Amazingly enough, I was actually able to cut the cake into three layers.
Now for the saga with pralines paste, I made the pralines as per the recipe. Then I realised that the recipe called for just 1/3 cup of it. So, I started making the pralines paste in small batches. Once I had the required 1/3 cup, I was 'generous' enough to distribute the 'Cashew Brittle' to my friends. I know, I'm a good friend :)
But even with all the mistakes and flops, the cake was just pure heaven.
You can find the full recipe here.
What do you think?

Thursday, July 10, 2008
Rajma Chapathi
After I found a really cool way to add protein to my chapatis, I have been trying out different types of beans and lentils. So, this time the experiment was on Rajma - Red Kidney beans. I had a vision of nice red chapatis. But the end result was not exactly the bright red I expected :) . But it tasted real good. Here is how I made it.
Rajma Chapati
Ingredients
Rajma Chapati
Ingredients
Durum Atta - 1 cup
Cooked Rajma - 1 cup
Salt - 1/4 to 1/2 tsp
Oil/Ghee - 2 tsp
water - as needed
Instructions:
- Mix salt and atta together in a bowl
- Add oil and mix well
- Grind rajma to make a paste
- Add the paste to the atta mixture and mix well
- Add water if needed to make soft and pliable chapathi dough
- Coat it with oil, wrap it with plastic wrap and let it rest for 30 mins
- Take a lemon sized ball of dough and roll out the dough into a thick chapathi
- Heat tawa. You can apply oil or ghee if you want to.Place the chapathi on the hot tawa.
- Turn it over once you start seeing the bubbles form.
- Take it out once its cooked on both sides.
I served it with Chicken curry. It was a big hit with my family.

Wednesday, July 9, 2008
First Birthday

My baby girl turned one last weekend. She was not into any characters like Winnie the pooh or Einstein or anything like that. I usually buy some character themed cake for birthdays since I have never been confident in making good looking and good tasting cakes. I have to confess even though I bought the cakes, I was never thrilled about the taste. Since joining the Daring Bakers, my confidence has grown a lot. I was not going to buy a cake for my daughter when I can make one.
DH comes up with good ideas for cakes even though he doesn't know one end of the oven from another. But I balked when my DH suggested a 3D cake. 3D cake!! Was he kidding? Anyway, he got his way and I bought the Stand-up Teddy bear pan at our local Michaels. I was very apprehensive about the whole thing. The instruction sheet suggested I use box cake mix. I made my own pound cake batter which I have already blogged here. My heart was pounding the whole time the cake was baking. When the pan was cool enough to open, I made DH to open it :) . There was a teeny weeny hole near the Bear's neck. Other than that, the cake looked good.
Then came the task of decorating the cake. While I have worked with fondant, I have never worked with the different decoration tips and buttercream icing to actually decorate the cake. It took me around 4 hrs to decorate the whole cake. But it was time well spent. The cake looked awesome!!! By the time, I finished decorating the cake, the teeny weeny hole has disappeared :)) .
I also made a Mango Opera cake for the grown-ups. Both the cakes were a great hit with both the kids and adults alike.
Both the cakes were

Sunday, June 29, 2008
Braids and Challenges
Here is to surviving another Daring Bakers Challenge. This month's challenge was graciously hosted by Kelly of Sass & Veracity, and Ben of What’s Cookin’? . They chose Danish braid as this month's challenge.
The first thing which I noticed in the recipe was Yeast. Now if its one thing which scares me when it comes to baking is Yeast. Its finicky and has its own mind. Dry yeast will not activate if you don't have the right temperature. If yeast is not activated, then what ever you are making is not going to rise and its a disaster in the making. Did I tell you that I was scared of Yeast? So, I gathered all the courage I could find and made the Danish Braid. And it was awesome. There is absolutely nothing to beat home made danish.
We were allowed to fill the danish braid with anything as long as it made from scratch. I chose to make a mango filling and a banana raisin filling. I liked the banana raisin filling better than the mango filling. You can view all the other daring bakers amazing creations here.
DANISH DOUGH
Makes 2-1/2 pounds dough
Ingredients
For the dough (Detrempe)
1 ounce fresh yeast or 1 tablespoon active dry yeast
1/2 cup whole milk
1/3 cup sugar
Zest of 1 orange, finely grated
3/4 teaspoon ground cardamom
1-1/2 teaspoons vanilla extract
1/2 vanilla bean, split and scraped
2 large eggs, chilled
1/4 cup fresh orange juice
31/4 cups all-purpose flour
1 teaspoon salt
Instructions
- Combine yeast and milk in the bowl of a mixer fitted with the paddle attachment and mix on low speed.
- Slowly add sugar, orange zest, cardamom, vanilla extract, vanilla seeds, eggs, and orange juice. Mix well.
- Change to the dough hook and add the salt with the flour, 1 cup at a time, increasing speed to medium as the flour is incorporated. Knead the dough for about 5 minutes, or until smooth.
- You may need to add a little more flour if it is sticky. Transfer dough to a lightly floured baking sheet and cover with plastic wrap. Refrigerate for 30 minutes.
Without a standing mixer:
- Combine yeast and milk in a bowl with a hand mixer on low speed or a whisk.
- Add sugar, orange zest, cardamom, vanilla extract, vanilla seeds, eggs, and orange juice and mix well.
- Sift flour and salt on your working surface and make a fountain.
- Make sure that the “walls” of your fountain are thick and even. Pour the liquid in the middle of the fountain.
- With your fingertips, mix the liquid and the flour starting from the middle of the fountain, slowly working towards the edges.
- When the ingredients have been incorporated start kneading the dough with the heel of your hands until it becomes smooth and easy to work with, around 5 to 7 minutes. You might need to add more flour if the dough is sticky.
Ingredients
For the butter block (Beurrage)
1/2 pound (2 sticks) cold unsalted butter
1/4 cup all-purpose flour
Instructions
- Combine butter and flour in the bowl of a mixer fitted with a paddle attachment and beat on medium speed for 1 minute. Scrape down the sides of the bowl and the paddle and then beat for 1 minute more, or until smooth and lump free. Set aside at room temperature.
Assembling the dough
- After the detrempe has chilled 30 minutes, turn it out onto a lightly floured surface. Roll the dough into a rectangle approximately 18 x 13 inches and ¼ inch thick.
- The dough may be sticky, so keep dusting it lightly with flour.
- Spread the butter evenly over the center and right thirds of the dough.
- Fold the left edge of the detrempe to the right, covering half of the butter.
- Fold the right third of the rectangle over the center third. The first turn has now been completed.
- Mark the dough by poking it with your finger to keep track of your turns, or use a sticky and keep a tally.
- Place the dough on a baking sheet, wrap it in plastic wrap, and refrigerate for 30 minutes.3. Place the dough lengthwise on a floured work surface.
- The open ends should be to your right and left.
- Roll the dough into another approximately 13 x 18 inch, ¼-inch-thick rectangle.
- Again, fold the left third of the rectangle over the center third and the right third over the center third.
- No additional butter will be added as it is already in the dough.
- The second turn has now been completed. Refrigerate the dough for 30 minutes.
- Roll out, turn, and refrigerate the dough two more times, for a total of four single turns.
Make sure you are keeping track of your turns. Refrigerate the dough after the final turn for at least 5 hours or overnight. The Danish dough is now ready to be used. If you will not be using the dough within 24 hours, freeze it. To do this, roll the dough out to about 1 inch in thickness, wrap tightly in plastic wrap, and freeze. Defrost the dough slowly in the refrigerator for easiest handling. Danish dough will keep in the freezer for up to 1 month.

Wednesday, May 28, 2008
My very first Daring Bakers Challenge
I have admired all the wonderful cooking blogs we have in the blogsphere for couple of years now. But there is one forum which stood out among all and was an inspiration to create a blog. Its the Daring Bakers Blogroll. This a group of amazing bakers who tackle one baking challenge a month. This is my first challenge and the five page long recipe had me shaking in the my boots. This month's challenge was Opera Cake hosted by Lis, Ivvone, Fran and Shea.
The first time I made the cake, everything turned out just perfect except for the buttercream. I still assembled the cake. The cake tasted heavenly but it looked pathetic. So, I made the cake again. This time though I started with the buttercream. I was going to make the cake only if the buttercream turned out right. The buttercream turned out perfect. So, I made the rest of the cake and assembled. While the cake looked good, I have to say my first experiment tasted the best.
We were allowed to change the flavors of the cake as long as the colors are light. Dark colors are absolute no-no. So, I made the cake with cashew and mango flavouring. I was planning to make it as a pista and mango combination. But unfourtunately, I was not able to find enough pista to make the cake.
A Taste of Light: Opéra Cake
For the joconde
Ingredients:
6 large egg whites, at room temperature
2 tbsp granulated sugar
2 cups ground blanched almonds
2 cups icing sugar, sifted
6 large eggs
½ cup all-purpose flour
3 tbsp unsalted butter, melted and cooled
Instructions:
Ingredients:
½ cup water
⅓ cup granulated sugar
1 to 2 tbsp. of the flavouring of your choice
Instructions:
Ingredients:
1 cup granulated sugar
¼ cup water
seeds of one vanilla bean or 1 tbsp. pure vanilla extract
1 large egg
1 large egg yolk
1¾ sticks unsalted butter, at room temperature
1 tbsp flavoring of your choice
Instructions:
For the white chocolate ganache/mousse
Ingredients:
7 ounces white chocolate
1 cup plus 3 tbsp. heavy cream
1 tbsp. liquer of your choice
Ingredients:
14 ounces white chocolate, coarsely chopped
½ cup heavy cream
Instructions:
Line a baking sheet with parchment or wax paper.
Working with one sheet of cake at a time, cut and trim each sheet so that you have two pieces (from each cake so you’ll have four pieces in total): one 10-inch (25-cm) square and one 10 x 5-inch (25 x 12½-cm) rectangle.
The first time I made the cake, everything turned out just perfect except for the buttercream. I still assembled the cake. The cake tasted heavenly but it looked pathetic. So, I made the cake again. This time though I started with the buttercream. I was going to make the cake only if the buttercream turned out right. The buttercream turned out perfect. So, I made the rest of the cake and assembled. While the cake looked good, I have to say my first experiment tasted the best.
We were allowed to change the flavors of the cake as long as the colors are light. Dark colors are absolute no-no. So, I made the cake with cashew and mango flavouring. I was planning to make it as a pista and mango combination. But unfourtunately, I was not able to find enough pista to make the cake.
A Taste of Light: Opéra Cake
For the joconde
Ingredients:
6 large egg whites, at room temperature
2 tbsp granulated sugar
2 cups ground blanched almonds
2 cups icing sugar, sifted
6 large eggs
½ cup all-purpose flour
3 tbsp unsalted butter, melted and cooled
Instructions:
- Divide the oven into thirds by positioning a rack in the upper third of the oven and the lower third of the oven.
- Preheat the oven to 425◦F.
- Line two 12½ x 15½- inch (31 x 39-cm) jelly-roll pans with parchment paper and brush with melted butter.
- In the bowl of a stand mixer fitted with the whisk attachment (or using a handheld mixer), beat the egg whites until they form soft peaks. Add the granulated sugar and beat until the peaks are stiff and glossy. If you do not have another mixer bowl, gently scrape the meringue into another bowl and set aside.
- If you only have one bowl, wash it after removing the egg whites or if you have a second bowl, use that one. Attach the paddle attachment to the stand mixer (or using a handheld mixer again) and beat the almonds, icing sugar and eggs on medium speed until light and voluminous, about 3 minutes.
- Add the flour and beat on low speed until the flour is just combined (be very careful not to overmix here!!!).
- Using a rubber spatula, gently fold the meringue into the almond mixture and then fold in the melted butter. Divide the batter between the pans and spread it evenly to cover the entire surface of each pan.
- Bake the cake layers until they are lightly browned and just springy to the touch. This could take anywhere from 5 to 9 minutes depending on your oven. Place one jelly-roll pan in the middle of the oven and the second jelly-roll pan in the bottom third of the oven.
- Put the pans on a heatproof counter and run a sharp knife along the edges of the cake to loosen it from the pan. Cover each with a sheet of parchment or wax paper, turn the pans over, and unmold.
- Carefully peel away the parchment, then turn the parchment over and use it to cover the cakes. Let the cakes cool to room temperature.
Ingredients:
½ cup water
⅓ cup granulated sugar
1 to 2 tbsp. of the flavouring of your choice
Instructions:
- Stir all the syrup ingredients together in the saucepan and bring to a boil.
- Remove from the heat and let cool to room temperature.
Ingredients:
1 cup granulated sugar
¼ cup water
seeds of one vanilla bean or 1 tbsp. pure vanilla extract
1 large egg
1 large egg yolk
1¾ sticks unsalted butter, at room temperature
1 tbsp flavoring of your choice
Instructions:
- Combine the sugar, water and vanilla bean seeds or extract in a small saucepan and warm over medium heat just until the sugar dissolves.
- Continue to cook, without stirring, until the syrup reaches 225◦F (107◦C) [*Note: Original recipe indicates a temperature of 255◦F (124◦C), however, when testing the recipe I found that this was too high so we heated to 225◦F and it worked fine] on a candy or instant-read thermometer. Once it reaches that temperature, remove the syrup from the heat.
- While the syrup is heating, begin whisking the egg and egg yolk at high speed in the bowl of your mixer using the whisk attachment. Whisk them until they are pale and foamy.
- When the sugar syrup reaches the correct temperature and you remove it from the heat, reduce the mixer speed to low speed and begin slowly (very slowly) pouring the syrup down the side of the bowl being very careful not to splatter the syrup into the path of the whisk attachment. Some of the syrup will spin onto the sides of the bowl but don’t worry about this and don’t try to stir it into the mixture as it will harden!
- Raise the speed to medium-high and continue beating until the eggs are thick and satiny and the mixture is cool to the touch (about 5 minutes or so).
- While the egg mixture is beating, place the softened butter in a bowl and mash it with a spatula until you have a soft creamy mass.
- With the mixer on medium speed, begin adding in two-tablespoon chunks. When all the butter has been incorporated, raise the mixer speed to high and beat until the buttercream is thick and shiny.
- At this point add in your flavouring and beat for an additional minute or so.
- Refrigerate the buttercream, stirring it often, until it’s set enough (firm enough) to spread when topped with a layer of cake (about 20 minutes).
For the white chocolate ganache/mousse
Ingredients:
7 ounces white chocolate
1 cup plus 3 tbsp. heavy cream
1 tbsp. liquer of your choice
Instructions:
- Melt the white chocolate and the 3 tbsp. of heavy cream in a small saucepan.
- Stir to ensure that it’s smooth and that the chocolate is melted. Add the tablespoon of liqueur to the chocolate and stir. Set aside to cool completely.
- In the bowl of a stand mixer, whip the remaining 1 cup of heavy cream until soft peaks form.
- Gently fold the whipped cream into the cooled chocolate to form a mousse.
- If it’s too thin, refrigerate it for a bit until it’s spreadable.If it’s too thin, refrigerate it for a bit until it’s spreadable.
Ingredients:
14 ounces white chocolate, coarsely chopped
½ cup heavy cream
Instructions:
- Melt the white chocolate with the heavy cream. Whisk the mixture gently until smooth.
- Let cool for 10 minutes and then pour over the chilled cake. Using a long metal cake spatula, smooth out into an even layer.
- Place the cake into the refrigerator for 30 minutes to set.
Line a baking sheet with parchment or wax paper.
Working with one sheet of cake at a time, cut and trim each sheet so that you have two pieces (from each cake so you’ll have four pieces in total): one 10-inch (25-cm) square and one 10 x 5-inch (25 x 12½-cm) rectangle.
Place one square of cake on the baking sheet and moisten it gently with the flavoured syrup.Spread about three-quarters of the buttercream over this layer.
Top with the two rectangular pieces of cake, placing them side by side to form a square.
Moisten these pieces with the flavoured syrup.Spread the remaining buttercream on the cake and then top with the third square of joconde.
Use the remaining syrup to wet the joconde and then refrigerate until very firm (at least half an hour).
Prepare the ganache/mousse (if you haven’t already) and then spread it on the top of the last layer of the joconde.
Refrigerate for at least two to three hours to give the ganache/mousse the opportunity to firm up.
Make the glaze and after it has cooled, pour/spread it over the top of the chilled cake. Refrigerate the cake again to set the glaze.
Serve the cake slightly chilled.
This recipe will yield approximately 20 servings.
I made the joconade with cashew nuts.The buttercream, syrup and mouusee were mango flavoured.
Here is my result,

Wednesday, May 21, 2008
Karramani kadalai chapathi
Leftover ingredients and blogging are making me very creative. Couple of days back, I wrote about 'protein' at our home. Well, I had some left over black eyed peas and channa. My first thought was to just add it to some curry and be done with it. Then I remembered the Roti Mela hosted by Srivalli at Cooking 4 All seasons . So, I made a paste of the left over black eyed peas and channa and made a chapathi out of it. It turned out really good. And I'm sure its healthy too with all that added protein. Here is how I made it,

Karramani Kadalai Chapath
Ingredients:
Durum Atta - 1 cup
Boiled black eyed peas/ Karramani - 1/2 cup
Boiled channa/Garbanzo/Kadalai - 1/2 cup
Salt - 1/4 to 1/2 tsp
Oil/Ghee - 2 tsp
water - as needed
Instructions:
- Mix salt and atta together in a bowl
- Add oil and mix well
- Grind black eyed peas and channa together to make a paste
- Add the paste to the atta mixture and mix well
- Add water if needed to make soft and pliable chapathi dough
- Coat it with oil, wrap it with plastic wrap and let it rest for 30 mins
- Take a lemon sized ball of dough and roll out the dough into a thick chapathi
- Heat tawa. You can apply oil or ghee if you want to
- Place the chapathi on the hot tawa.
- Turn it over once you start seeing the bubbles form.
- Take it out once its cooked on both sides.
The chapathi came out soft. Its much more filling than the ordinary chapathi. I served it with Veg Kurma I adapted from Gobi Broccoli Kurma at Foodies Hope . I'll post that soon.
I'm submitting this for Srivalli's 

Tuesday, May 20, 2008
Mango banana smoothie
What do you do with left over mango puree, bland mango chunks and an overripe banana? You make a smoothie out of it. When I went home from work yesterday, there were just couple of leftover ingredients which I didn't know what to do with individually. I had some mango puree which was in a big bowl and taking most of the space in the fridge. I had an overripe banana nobody would go near. I also had a mango which had absolutely no taste. It was either make something out of them immediately or throw them out. Since I was not ready to throw them out, I made a smoothie out of it.

Mango Banana Smoothie
Ingredients:
Mango Puree - 1 cup
Mango chunks - 1/2 cup
Ripe banana - 1
Milk - 3/4 cup or to the consistency you like
Yogurt - 2 Tbsp
Sugar - 2 Tbsp or to taste
Cardamom - 1
Instructions:
- Place mango puree, mango chunks, banana and yogurt in a blender.
- Blend them well.
- Add enough milk to bring the smoothie to the consistency you like.
- Powder the cardamon and add it to the smoothie.
The smoothie was refreshing and sweet. While I made this as a evening snack, this would make a great breakfast smoothie too. I'm submitting this for  hosted by Arundati at Escapades .
Since milk, yogurt and banana are rich in calcium, I'm submitting this for  hosted by Food Blogga
Here is the result,

Sunday, May 18, 2008
Protein and Click event
I have been trying to lose the weight I gained with my daughter. And let me just say that its not going too good. My problem comes from the fact that I cannot resist food and I tend to overeat. So, I read a lot about life style and weight loss. One fact stands out in whatever I have read so far and that is exercise and portion control. While I have started working out everyday, I still have issues as far as portion control is concerned. It also helps to eat 4 to 5 small meals instead of 3 heavy meals. This lead me to the quest of finding healthy snacks.
And one of the favourites in my home is what my husband calls 'protein'. 'Protein' is just cooked dried lentils or beans and minimally prepared. Our personal favourites are channa, rajma, black eyed peas and moong. I just soak them in water overnight. The next day, its pressure cooked and mildly salted. I know it sounds bland, but it turns out perfect. You really enjoy the flavour of the beans. I took the following picture showcasing all the beans which we like at our home. I'm submitting the photo for this month's hosted by Bee and Jai. This month's theme is Beans and Lentils. Here is my entry,
And one of the favourites in my home is what my husband calls 'protein'. 'Protein' is just cooked dried lentils or beans and minimally prepared. Our personal favourites are channa, rajma, black eyed peas and moong. I just soak them in water overnight. The next day, its pressure cooked and mildly salted. I know it sounds bland, but it turns out perfect. You really enjoy the flavour of the beans. I took the following picture showcasing all the beans which we like at our home. I'm submitting the photo for this month's
hosted by Bee and Jai. This month's theme is Beans and Lentils. Here is my entry, 
Thursday, May 15, 2008
Raspberry Custard
I made a simple sponge cake couple of days back and I had some egg yolks left. My MIL used some of them to make scrambled eggs. I still had two egg yolks left. The only thing that came to my mind to make use of these two egg yolks was custard. I had some raspberries also. So, I made Raspberry custard. Here is the recipe,
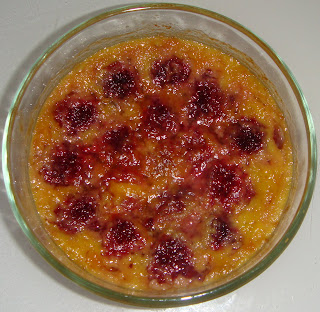

Raspberry Custard
Ingredients
Egg yolks - 2
Heavy cream - 3/4 cup
Sugar - 3 tbsp
Vanilla - 1/4 tsp
raspberries - some
Instructions
- Pre-heat the oven to 350 degrees F
- Place egg yolks, heavy cream, vanilla and sugar in a bowl and beat well.
- Arrange the raspberries on the bottom of a small oven safe glass/ceramic bowl/ramekin.
- Pour the egg mixture on top
- Bake it in the pre-heated oven for 50 mins
- Then cool the custard and chill
You can serve the custard warm also. The custard was smooth and sweet. The fresh raspberries was burst of flavour in midst of the smooth and sweet custard.
Here is the result,


I'm submitting this for two events.
The first one is  hosted by Ammalu's kitchen.
hosted by Ammalu's kitchen. 
Monday, May 12, 2008
Latest Addition to my Kitchen
My In-laws are going back to India next weekend. We wanted to take them out somewhere for their last weekend with us. We went to the Mayfield farm at Braselton, GA. If you are from south east US, you would be familiar with Mayfield Dairy products. Its know for its wonderful milk and creamy ice cream. We went for the dairy plant tour and tasted the wonderful ice cream. Then my husband asked 'Where are the cows?' . We were told that this was only a dairy plant and they don't have cows here. I think my husband was disappointed more than my kids. Anyway, I found this beautiful set of measuring spoons in the gift store. The ones I have the regular ones from the grocery store. There nothing special about them. But the one I saw in the gift store was just beautiful. They were carved metal spoons. It had the measures also carved as a part of the design. I adored it. Although I'm not an impulsive buyer, I bought this immediately. Here is the latest addition,


Tuesday, May 6, 2008
Simple Rasam
When I started cooking, I was able to make whatever I wanted without any big disasters. Sambar, dal, kootu.. I was able to make all these simply by following the recipe. But there was one thing I was never able to make and that was Rasam. I have made it with rasam powder, sambar powder, with dal water, without dal water...you name it, I have tried it. I always follow the recipe to the T but it always turns out to be a disaster. Then I found one recipe on the Internet couple of years back. That turned out PERFECT. I have never tasted a better rasam. I recently searched the net for the recipe again. I was not able to find it. I apologize for not linking the recipe to the original.
Here is the recipe, as I remember it
Simple Rasam
Ingredients
Ripe big tomato - 1/2
tamarind - small lemon size
Garlic - 2 smashed
Pepper pwd - 1/2 tsp
Cumin pwd - 1/2 tsp
Salt to taste
For tempering
curry leaves - 5
mustard - 1/4 tsp
Hing - a pinch
Red chili - 1
Instructions
Here is the recipe, as I remember it
Simple Rasam
Ingredients
Ripe big tomato - 1/2
tamarind - small lemon size
Garlic - 2 smashed
Pepper pwd - 1/2 tsp
Cumin pwd - 1/2 tsp
Salt to taste
For tempering
curry leaves - 5
mustard - 1/4 tsp
Hing - a pinch
Red chili - 1
Instructions
- Chop the tomato roughly
- Soak tamarind in 1 cup of water for 1/2 hour and take the extract
- Place tomato, tamarind extract and smashed garlic in the vessel you will be making the rasam
- Squish all the these together using your hands. By the time you are done, there should not be any meat left in the tomatoes.
- Add the cumin and pepper powder to this and mix.
- Add 1 cup of water to this and mix
- Add salt and adjust the rasam to your taste.
- Cover the vessel and place it on the the stove and keep it at the lowest setting.
- Check every 5 mins.
- When you see froth around the edges of the rasam, the rasam is done.
- Switch of the stove.
- Heat oil in a separate pan.
- When hot, add mustard, chili, curry leaves and hing.
- Pour the tempering over the rasam and keep it closed till ready to serve
Its very important that you don't let the rasam boil. It spoils the taste. I'm submitting this to  hosted by Meena at Hooked on Heat .
Here is the result,
Monday, May 5, 2008
Semiya Payasam
Back home, the highlight of any feast for me is payasam. And my favourite is Semiya Paysam. Traditional semiya payasam is made with plain milk. I personally don't like the taste of just milk. So, I add a little something to it make it likable to my taste. Here is how I make it,
Semiya Payasam
Ingredients
Semiya/Vermicelli - 1/2 cup
Milk - 1 1/2 cups
Coconut milk - 1/2 cup
Sugar - 1 cup
Cashews - 5 broken
Golden/Dark raisins - 10
Green Cardamon - 2 smashed
Saffron - 1 pinch
Ghee - 2 Tbsp
Instructions
1. Heat ghee in a pan
2. Saute vermicelli till golden
3. Add cashews and raisins to this and saute for 30 seconds more
4. Remove the vermicelli mix from the pan
5. Heat the milk in the same pan and bring it to boil
6. Keep a close watch on the milk and don't let it boils over
7. Add the coconut milk to the milk and let it simmer for around 2 mins
8. Add the vermicelli mix and let it simmer till the vermicelli is 3/4th cooked
9. Add sugar and mix. Let it simmer till the vermicelli till fully cooked
10. Add the crushed cardamon and saffron. Close the pan and switch off the stove.
Coconut milk gives a wonderful taste to the payasam. I'm submitting this to


Subscribe to:
Comments (Atom)

